twitter
rss

Showing posts with label Preschool Activities. Show all posts

The past few months I’ve been on the hunt for fun hands on learning ideas for TBM, especially for Professor Chaos. I few things have fallen into my lap since then, and now that I have them pretty much all squared away I’m going to share them.

First on the list are our Discovery Bins. A friend of mine put together a sensory bin for her son and I thought that was a great idea, so off I went hunting for information on sensory bins. I found various sites that listed ideas from people *mostly preschool teachers*, and I took many of those ideas and set off to make comprise our own bins. Are you wondering why we call them Discovery Bins instead of sensory bins? Well one of the idea comments I found mentioned that in their class they call them Discovery Bins, and I thought that was very clever and honestly I prefer it over the term sensory bins. Since sensory bin doesn’t completely state what we are using it for. Yes, they will use their senses, but they *mainly Professor Chaos* will also have to discovery items in order to match them with an item already outside the bin, or how much rice it takes to fill something, and some other random not really sensory ideas that I may come up with one morning when I’m somewhere between sleep and a half empty cup of orange juice.

Here is a quick run through of what I have gathered so far for our Discovery Bins:
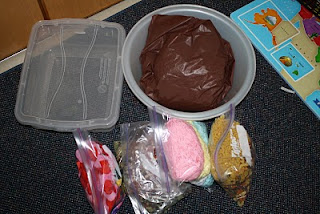
Here we have our large water basin I found at a 100 yen store *think dollar store prices, but with cooler stuff*, and the largest of our two bins. The brown plastic is a plastic table cover I got for our Co-Op's Fall Festival. It helps keep everything contained when the kids are working. I just collect anything that has fallen out of the bin into the middle of the plastic, then gather up and dump back into the bin. When used with the water basin the plastic is placed on the floor first, followed by a layer of towels, and lastly the basin. The plastic acts as a buffer for the floor. So even if the towels get soaked, our floor stays nice and dry. Also here are some of the bags of goodies I have put together. There are various beans and peas, the colored paper you usually find in an Easter basket, various types of pasta, and some fake flowers/petals. These are just what I have for right now, I'm planning to add to this as I come across ideas that seem doable with the resources we have around us.
Here we have our other *smaller* bin, it is currently full of short grain rice. Also on this "table" *it's not really a table...more on it later*, are two wire baskets they were bought to be used when we fill the water basin with soapy water so the TBM can make bubbles with them. They will probably find their way into other bin related fun as well. The water bottles are for when we work with dirt, or the water basin, really anything honestly. It just depends on what we are doing. The blue bucket holds the bulk of our Discovery Bin tools. We have measuring cups of various sizes, some plastic containers with lids of different sizes and color, a couple of squirt bottles, some whisk, sifters, small wooden spoons, tongs, rice scooper, these plastic cutting things used for cutting some sort of Japanese product, and colorful shot glasses. Everything aside from the shot glasses and the bins were bought at a 100 yen store. The shot glasses *that were about 50 or so cent a piece* and the bins came from our base exchange. Taking in account the current yen rate I spent about 60$ for everything we have currently. I highly recommend reusing items you already have if you can, shopping at dollar stores, and your local flea market/thrift store.

A closer look into the blue basket of fun. I really went wild in the kitchen supply section of the 100 yen store. And I just couldn't pass up the colorful shot glasses. The Spouse and I aren't drinkers so they aren't something one would usually find in our home, but TBM have a blast using them for purposes other than what they were made for. And I must admit it is a bit funny watching them play with them and be completley unaware of what most people use them for. I have to go back and get another one though, because I thought I had grabbed six but I only grabbed five. I have a thing about odd numbers...it's best to just not ask. The last Discovery Bin item I will show you are these little rake/tong combos I found at the 100 yen store. They are hung on our wall using Command(TM) strips *I love those things they make life so easy when you have to uproot frequently*.

Aside from the Discovery Bins I have also been working on Centers for us. My dear friend Karen over at St. Louis Homeschool Resources, Inc. sent me a goodie box full of various items. One of which was a book full of envelope centers. I had not heard of these until we got her box, but I had been wanting to create something similar. While I'm all for DIY projects sometimes being able to buy what you need in one place and put it together just a few things for it on your own is plenty of DIY for me. The Math Centers book she sent us was a hit, so I ordered a few more center books and I am currently in the middle of putting them all together. The above picture is one of the Math Centers, just to give everyone an idea of what they look like. They are so simple to put together, and my laminator ensures that the pieces will withstand any and everything that we *or movers* throw at them.

Here is a list of the Centers we have:

Envelope Centers Math (Pre-K)

Take It To Your Seat Phonics Centers (PreK-K)

Take It To Your Seat Science Centers (PreK-K)

Take It To Your Seat Math Centers (Grades 3-4)

Take It To Your Seat Literacy Centers (Grades 3-4)

Take It To Your Seat Science Centers (Grades 3-4)

Sensory Box/Bin Ideas:

Website One

Website Two

Website Three

Website Four

Copyright(c)2011 Rayven Holmes

For our science work the past couple of weeks we have been talking about flowers, plants, and photosynthesis. In order to help us we did some flower dying! Now we didn’t get the idea from this lesson plan, but it pretty much explains what we did. The only difference is that the one we used said to use one glass of colored water, and one glass of regular water. This seems to make it take longer for the whole flower to become colored *we’ll have to test that hypothesis at a later date to be sure*. The one big thing I would strongly recommend is that you hunt down carnations!

Every mention of this experiment calls for white carnations, but we couldn’t get our hands on any. So instead we had to use white roses, and while they are pretty, they aren’t cheap, they lack the fullest of carnations, and their stems are a bit thinner than carnation stems so splitting them is a little more difficult. All and all it worked out really well and the boys loved seeing their favorite colors appear on their flowers.

This week we are starting dinosaurs! Oh the fun we will have learning about those amazing creatures.


Here we have the two glasses and the split flower. I had to cut the flower shorter, and getting the right size for the glass was a pain. They still turned out great though. I used tape to keep the stem from splitting more.

The other flower required me to use tape to keep it from leaning out of the glass, along with a knife to weigh it down.


What they looked like before they changed colors!

Copyright(c)2011 Rayven Holmes

Well Child #2 isn’t much a tot anymore, he is a preschooler and this preschool status has had me mulling over for a while the best way to tackle his education. What shall I do with this bouncing sponge that is my child. He already knows some of the basics *colors, body parts, how to say the alphabet, and count to about 12 without mistakes*. We are currently working our way through letter and number recognition.

Number recognition is proving challenging not because he doesn’t get it, but because he insist on saying everything is the number of his age. Even if he knows it isn’t, and you can ask him to count the objects and he will count them and give you the correct answer. He just prefers everything to be the same number he is…which is actually kind of cute, but still slightly frustrating because I want to know that he really knows this.

I’ve tossed around for the last few months the idea of getting a box curriculum *nothing expensive* just something to get our feet wet on the kindergarten end with Child #2, since he is ready in some respects, but not ready in others. That way when the 2012-2013 school year rolls around we could either start formal kindergarten or our K/1st combo, since we’ve never really had solid grade levels it’s always just a combo of things.

For instance Child #1 is on a 1st/2nd combo *1st in Language Arts and History, 2nd in Reading and Math (their science topics are beyond what is usually taught in 1st/2nd grade so I don’t count it)*. It works and ensures each need is being meet, and while I’m finally at a point where I feel I have a good grasp on Child #1’s plans I am just now looking at the full picture with Child #2.

Should I go box to expose him to formal lessons since he is so vastly different from Child #1 or should I piece together something from what we already have and see how that pans out? I was so close to going box, just to help me figure out what exactly I should do with him. But then I realized I already know this child. When I really sat down and thought about it, I already know exactly how he learns.

He is a mover, a shaker, and a creator. He is a lover of bodily functions and knows how songs in their honor either freaks grown-ups out or sends them into hysterics. He is our little entertainer and constant source of laughter and frustration. He is definitely not a child meant to fit into any sort of box, and for to even consider it seems blasphemous to the very essences of who he is.

So now what? I realized getting a box was out of the question even though there was one I really wanted to try *mostly just because I wanted to try it…I’m an educational material junkie…don’t ever leave me alone at a homeschool convention please!* So what am I going to do with him for the 2011-2012 school year…well a lot of what we do now, with a little more emphasis put on it.

I currently have the PreK Learn To Read program through HOP, and we have used that a little. My current plan is to increase our usage of it throughout the rest of this school year, since it is fairly easy and can be completed before the end of our school year. After that we will move to the Kindergarten program that HOP has which we already own. I’ve started using it a bit just to see how Child #2 would react to it, and he enjoyed it. We just spent a few minutes playing the audio disk and flipping through the alphabet cards, but it appealed to him.

I know whatever I use with him, it will have to allow him to do something on his own *like flipping the cards*, as well as not confine him to a single area *an audio disk means he can move about the living room going through the cards while listening…which makes him very happy and even more eager to do a quick lesson*.

While I have phonics down, I still have to tackle the issue of math. It is such an easy subject for Child #1 and a lot of what he knows he taught himself . I have yet to actually teach him a math lesson this year, I just handed him the Saxon Math 2 workbook 1 and he has been going through it, reading the questions, asking for help when needed, and getting the work done.

He even takes it upon himself to write the days of the week on our class board so he doesn’t have to ask me to spell them when prompted to give a day of the week in a math problem. He has always been like this…Child #2 on the other hand is his polar opposite. And has to be taught accordingly, this I know.

Which means I have to be creative, yet still tackle my own personal feelings of guilt about potentially leaving something out in his education. I’m not 100% sure of how I will handle this in the higher grades, but for his PreK/K work I’m leaning towards various workbooks and hands on activities.

I can get workbooks from the base bookstore for very little money and we own a box full of math manipulatives, which will at least give us a base to spring from. Hopefully, it sparks his interest and then I can see about working in Saxon Math sometime during the 2012-2013 school year. And then just go from there.

As far as his science and history go, well I’m finding that just letting him be present has proven good enough. He enjoys doing our hands on stuff with us, and he is actually absorbing what he hears, even if it seems like he could care less. He just chooses to blurt out random facts *like that we live in the milky way* while holding a glass of milk at dinnertime.

Of course this earns mommy another point as The Spouse looks on in shock that his preschooler knows our galaxy, but it also helps ease my fears a bit. Maybe, just maybe if I’m consistent enough he will absorb it all and there is truly nothing to fear. Not like there isn’t any pressure not to screw him up or anything….

Copyright(c) 2010 Rayven Holmes

We made this fun little “pizza” the other day using a paper plate, some construction paper, and shapes I got from Enchanted Learning *I used pages from their shape book and shrunk them down before printing* . I’m pretty sure I got the idea from www.kidssoup.com, although I can’t find the exact link that mentioned it now.


Ideally the paper plate would have been colored brown for the crust, but the only plates we had were the ones with the plastic type coating on them *and I wasn‘t about to go out and deal the typhoon freak out crowd*. So we couldn’t color them brown and red *which is why I cut a red circle out of construction paper*. The red circle is our “sauce” and our “crust” is just special.

Anyways, I gave Child#2 the coloring pages and he looked at them and then decided he didn’t want to do anything *although he had just said he wanted to color*. So I figured if I did it with him, then maybe that would change his opinion. Thankfully it did. As soon as I picked up a crayon and said I would like to join in with him, he got really excited and off we went coloring pages and humming together.

While I don’t have photos of us coloring together, there is that moment you can’t capture on film, that twinkle in their eye that comes from that special one-on-one they can’t get anywhere else. While homeschooling isn’t always a bed of roses…in fact some days it’s more like a bed of rose thorns. But those special moments, with made up crayon inspired songs, make the thorns worth it for us.

After coloring, I cut out the shapes and handed Child#2 a glue stick, and he spent some time pasting his “toppings” onto his pizza. Afterwards we went over the shapes, I was shocked *and very pleased* that he pretty much already knew most of them.

He was able to show The Spouse when he got home from work and got multiple high fives as he named off the shapes. I think that may have been his favorite part of our little activity. I know his smiles and giggles sure made it seem that way.

Ah…the little moments. I should print this out and hang it up, so I can remember why we do this when he is gluing things to our walls and demanding candy.

Copyright(c)2010 Rayven Holmes

As part of my tweaking last week I redid our learning poster. I got the idea for a learning poster from Brightly Beaming Resources, but haven’t stuck to it very well. Hopefully with these changes I can actually stick to it. The poster was originally designed to go with Brightly Beaming’s Prep Curriculum, but I wasn’t really feeling it. I did like having a letter to focus on weekly, as well as the shape/color/number learning. I just needed to do it in a way that works for us.

So here is the original poster:


And here is the revised one:


I’ve gotten rid of the weekly theme, vocabulary word, and nursery rhyme. Instead of those we have our weekly poem, and our monthly virtue. Along with the virtue there is a weekly quote, the quote won’t always tie into the virtue, instead it would act more as food for thought. This learning poster will be for both boys to use as well *unlike the previous learning poster*.

I’ve dropped the letter of the week and have made a phonics section. It will feature a weekly letter for Child #2, but we will be focusing on the letter sound as well. I found these awesome phonics cards at our base bookstore. On the front they have the letter *upper and lower case* along with a picture of items that have that letter sound, then on the back there is a list of words with that sound as well.

For Child #1 I’m using the combination cards, which also feature words on the back that he has to read to me each day. To further help Child #2 learn the letter sounds and recognize words I’ve also added the words to a small dry erase board. He reads them with us every morning to help him hear the weekly sound in the words, and of course get a jump on the reading process.

I use to do this with Child #1 as well, we kept the small board on our front door, and before we left the house we would read the words. The words would either have the same letter sound or they would belong together some how *like family members, or rooms in a house, etc.*.

Also on the board is a math section. I’m going to alternate every week between numbers, colors, and shapes for Child #2. For Child #1 I made sheets with addition and subtraction facts on them, and he has to read a new sheet everyday.

So far the poster is working out great. The boys enjoy doing each piece, and Child #1 really loves reading the words with his brother. He gets to help his little brother learn while showing off what he is capable of doing, and while they are busy at work with their learning poster I can actually get breakfast cooked. It’s great!


Copyright(c) 2010 Rayven Holmes

All homeschoolers are accustomed to DIY *Do-It-Yourself* projects at some point in time. They tend to be cheaper, easier, and just as affective.

Well this week I did a little DIY project, which was very successful. All I needed was a piece of printer paper, some crayons, and our Sweet Treats Counters.

I took the paper and made patterns in some of the colors represented in our Sweet Treats Counters.

Then I let Child #2 at it. First by sorting the colors, then having fun with his patterns.

Quick, Easy, and Free. What more could a homeschooler ask for?!

Copyright(c) 2010 Rayven Holmes